.png)
Open a sensor by clicking on a sensor's DevEUI in lists, tables or Quick Search.The first tab is a sensor overview.
.png)
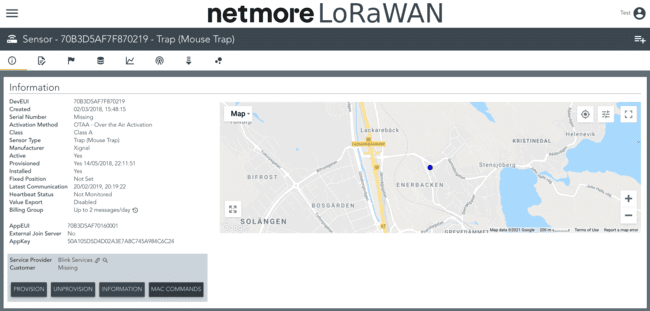
All green fields on the page are editable.
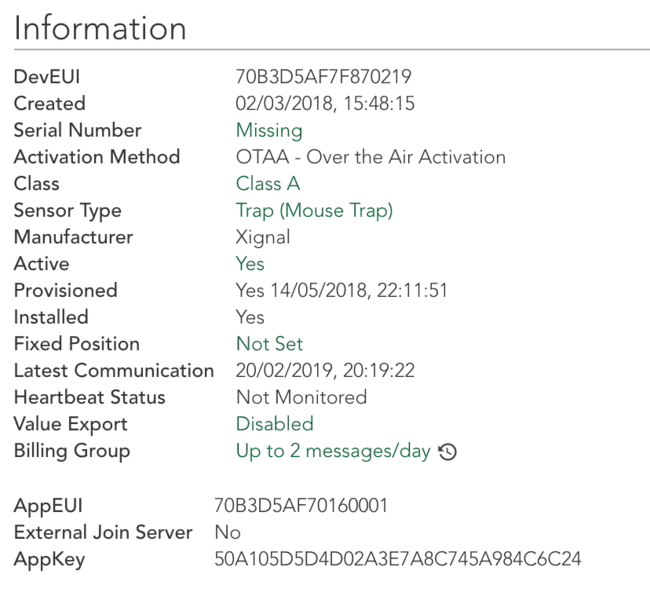
Here you will find information about the sensor's DevEUI, sensor type and manufacturer. If it is a general sensor that Netmore Portal does not specifically support, only the sensor class: Class A or C (OTAA or ABP) is displayed. There is no information about the manufacturer for general sensors.
The sensor is activated by the service provider. Only active sensors appear in the search list. The choice if a sensor is active or inactive is only a function of Netmore Portal and has no connection to whether the sensor is active or not on the network server.
If the sensor has been commissioned and has started to communicate, it will appear in the Provisioned field. The time is available for when the sensor last communicated, whether it has export of values enabled and what communication method the sensor uses, OTAA or ABP.
If the sensor has been configured to generate events if new messages enter a certain time interval, heartbeat status will be visible by changing its value from Not Monitored to Communicates.
If an event is generated that new messages are not received from the sensor, this will appear in the sensor overview.
For more information about exporting values and billing group see Chapter Export of Values and Billing Group.
And lastly you can see which AppEUI and AppSKey sensor has, if the communication method is OTAA and AppSkey and NwkSKey if the communication method is ABP.
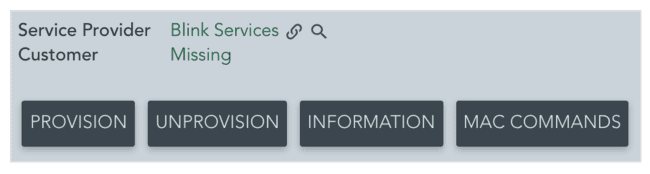
In the grey box you can see which Service Provider the sensor is associated with and whether it is associated with a customer. These can be changed so that a sensor can be connected to another service provider if this occurs.
Even the selected customer can be changed provided that the user has access to this function. To get access to other service providers or customers, contact Netmore Services for support.
PROVISION and UNPROVISION buttons are explained in the next section below.
Press INFORMATION to see more technical details of the sensor.
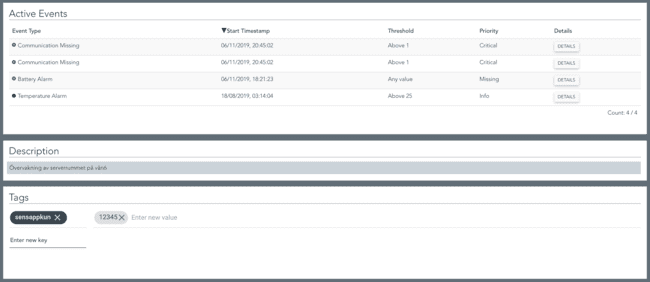
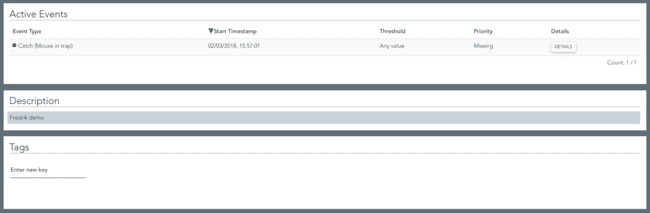
Below sensor overview you can see if there are any active events for the sensor with information about when the event started, thresholds, priority and the ability to view additional details of the event. See Chapter Find Event and Event Alert for more information.
A longer description of the sensor is possible. For example, the description field can be used to indicate more details about where the sensor is located and what it is used for. The description field is also visible in the coverage map if a sensor is highlighted in the map.
At the bottom of the page is the section for information tags attached to the sensor.
Here, the service provider can enter keys to which one or more values can be attached.
Keys and values can be created with both text, numbers, and special characters, and apply only to the sensor in which they are created, that is, they are not global tags that other sensors know. Both key and value are created by first entering text with pressing Enter to create the key or value. You can enter multiple keys with the associated value/values for a sensor. To remove a value or key with all associated values, click the X next to it.
When keys and values are created and the sensor's Export of values is set to Default ActiveMQ or Experimental ActiveMQ, keys and values are also exported out of Netmore Portal. This gives the service provider an opportunity to add meta-data to a sensor that can then be interpreted by the system sensor data in which it is exported to.